Unlock Parisian Delight: Crafting Perfect Nutella Crepes at Home
Imagine the bustling streets of Paris, the aroma of freshly made crepes wafting through the air, drawing you towards a charming street vendor. Among the most beloved variations, nutella crepes stand out as a timeless classic, a simple yet profoundly satisfying treat. Once a specialty you might only find abroad or at a high-end brunch spot, the joy of a warm, thin, golden crepe slathered with rich hazelnut-chocolate spread is now effortlessly achievable in your very own kitchen. This comprehensive guide will walk you through creating these delightful confections, transforming simple ingredients into a truly magical experience. Making easy Nutella crepes at home isn't just about following a recipe; it's about embracing a culinary art that is surprisingly forgiving and incredibly rewarding. From perfecting the silky batter to mastering the delicate flip, you'll soon be churning out beautiful crepes that rival any professional's. Get ready to embark on a journey that promises pure, unadulterated pleasure with every bite.The Art of the Batter: Ingredients and Preparation Secrets
The foundation of any perfect crepe lies in its batter. Achieving that desirable thinness and tender texture requires a balanced blend of simple ingredients and a few key techniques. Don't let the simplicity fool you; subtle nuances can elevate your crepes from good to truly exceptional.Essential Ingredients:
- All-Purpose Flour: The structural backbone of your crepe. For the best results, sift it to avoid lumps.
- Eggs (and an extra yolk): Eggs provide richness, structure, and help bind the batter. The extra yolk, a chef's secret, contributes to a more tender and pliable crepe with a richer color.
- Milk & Water: A combination of liquids ensures the perfect consistency – thin enough to spread easily, but strong enough not to tear. Water also helps create a lighter crepe.
- Sugar: Just a touch sweetens the crepes subtly and aids in browning.
- Salt: A pinch enhances all the other flavors.
- Unsalted Butter (Browned is Best!): This is where a significant part of the magic happens. While melted butter works, browning your butter takes your crepes to another level entirely.
- Nutella: The star of the show! This luscious hazelnut and chocolate spread is the quintessential filling.
The Browned Butter Advantage:
Jeffrey Saad’s technique of browning butter is a game-changer for these homemade Nutella crepes. To brown butter, melt unsalted butter in a medium nonstick pan over medium heat. Continue cooking, swirling occasionally, until the milk solids separate and turn a rich golden brown, emitting a wonderfully nutty aroma. Remove it from the heat as soon as it turns golden; residual heat will continue to cook it, and you want to avoid burning. This simple step infuses your crepes with a deep, complex, nutty flavor that plain melted butter simply can't replicate, adding an incredible depth to your already delicious treat.
Batter Mixing & Resting:
- In a medium bowl, gently whisk together the eggs, extra egg yolk, water, milk, and salt until just combined. Over-whisking at this stage can incorporate too much air, leading to tougher crepes.
- Add the flour and whisk until smooth. Gradually pour in the cooled browned butter, whisking constantly to ensure it fully incorporates without scrambling the eggs.
- If there are any persistent lumps, don't hesitate to strain the batter through a fine-mesh sieve. This ensures an impossibly smooth consistency, which is crucial for thin crepes.
- The Resting Period: This step is often overlooked but incredibly important. Let your batter rest for at least 10-15 minutes, or ideally 30 minutes, at room temperature. This allows the flour to fully hydrate and the gluten to relax, resulting in a more tender, pliable, and less sticky crepe. It also gives any air bubbles a chance to dissipate, leading to smoother surfaces.
Mastering the Pan: Cooking Thin, Golden Crepes
Once your batter is perfectly rested, it's time to bring your crepes to life on the stovetop. The cooking process is quick and requires a bit of finesse, but with practice, you'll develop a rhythm that feels almost meditative.Essential Equipment:
- Non-Stick Skillet (8-10 inch): A good quality non-stick pan is paramount. If you have a dedicated crepe pan with low sides, even better!
- Rubber Spatula: Thin and flexible, essential for lifting and flipping delicate crepes.
- 1/3 or 1/4-Cup Measure: For consistent batter portions.
- Paper Towels: For lightly greasing the pan between crepes.
Cooking Instructions:
- Heat Management: Place your non-stick pan over medium heat. This is crucial; too low, and the crepes will be pale and rubbery; too high, and they'll burn before cooking through. A well-heated pan is essential for the batter to set quickly.
- Lightly Grease: Use a paper towel to lightly wipe the pan with a tiny bit of butter or oil, especially for the first few crepes. You want a very thin, almost invisible film.
- Pour and Swirl: Using your chosen measuring cup (1/3 cup for an 8-inch pan, 1/4 cup for a 10-inch pan, adjust as needed), scoop the batter and pour it into the center of the hot pan. Immediately, using a rotating motion with your wrist, swirl the batter around and out to the edges of the pan to create a thin, even layer. The goal is "the thinner, the better."
- Cook the First Side: Return the pan to the heat and cook for approximately 1-2 minutes. You’ll know it’s ready when the edges start to crisp and lift slightly, and the surface looks set with small bubbles.
- The Flip: Use a rubber spatula to gently lift an edge of the crepe. Once you can get under it, swiftly but carefully flip the crepe over. Cook on the second side for a much shorter time, about 30 seconds to 1 minute, depending on how golden you prefer your crepes.
- Repeat: Slide the cooked crepe onto a plate. Repeat the process with the remaining batter, lightly greasing the pan as needed, usually after every 2-3 crepes.
Pro Tip for Perfection: The very first crepe is often considered the "test crepe." It might not be perfect – a bit too thick, or not quite golden enough. Don't worry! This allows you to adjust your pan temperature or batter amount. Enjoy this "test" as a chef's treat!
Filling, Folding, and Serving Your Nutella Crepes
With a stack of warm, golden crepes ready, the moment of truth arrives: filling them with that irresistible hazelnut-chocolate goodness. This is where personal preference truly shines, from the amount of Nutella to the final presentation and garnishes.The Nutella Experience:
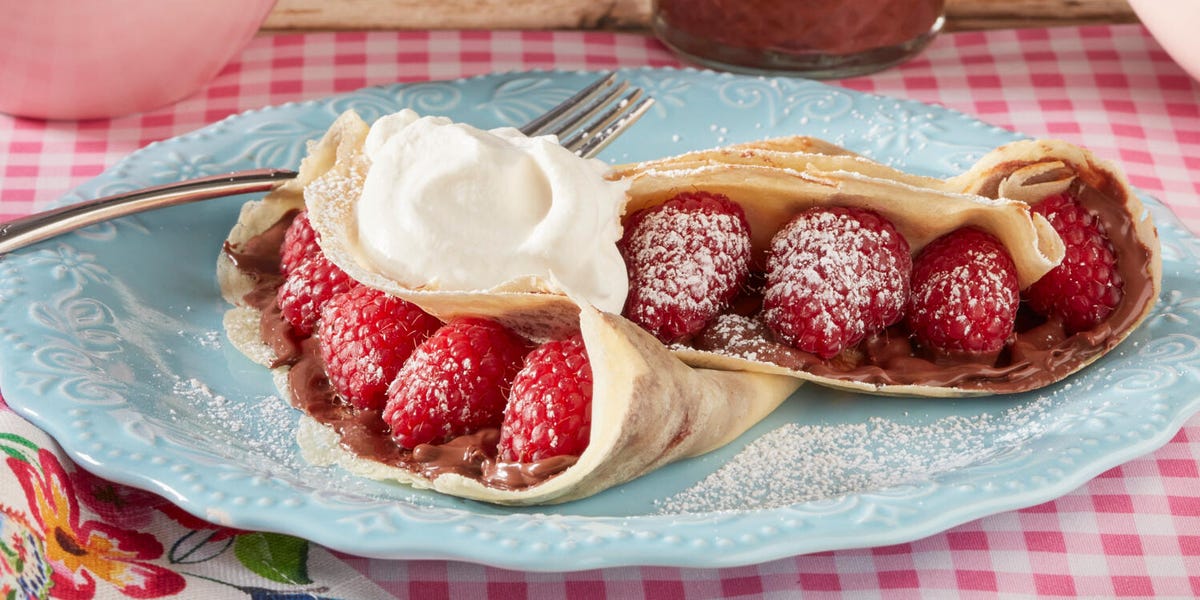
While Nutella is now widely available in most supermarkets, its luscious, creamy texture and rich flavor never cease to delight. Slather a generous tablespoon (or more, if you dare!) of Nutella onto one half of your warm crepe. The heat from the crepe will slightly melt the Nutella, making it even more spreadable and decadent.
Folding Techniques:
- The Classic Triangle: Fold the crepe in half, then fold it in half again to form a neat triangle. This is a traditional and elegant presentation, perfect for showcasing the warm Nutella filling.
- The Loose Roll: For a more casual and equally delicious approach, simply roll up the crepe loosely like a carpet. This method is great for on-the-go snacking and allows for a more rustic feel.
Beyond Nutella: Creative Garnish & Topping Ideas:
While Nutella alone is perfection, don't be afraid to experiment with additional toppings to elevate your Nutella crepes even further:
- Fresh Fruit: Sliced bananas, strawberries, raspberries, or blueberries pair beautifully with Nutella.
- Powdered Sugar: A light dusting adds a touch of sweetness and a beautiful finish.
- Whipped Cream: A dollop of freshly whipped cream can add a delightful contrast in texture and richness.
- Chopped Nuts: Toasted hazelnuts, almonds, or pecans can enhance the nutty flavor profile.
- Chocolate Shavings or Sauce: For the ultimate chocolate lover, a drizzle of chocolate sauce or a sprinkle of dark chocolate shavings takes it up a notch.
- Caramel Sauce: A touch of caramel adds another layer of sweet indulgence.
Serve your warm homemade Nutella crepes immediately, letting the rich aroma and exquisite taste transport you straight to a Parisian café. They are one of life's truly simple pleasures, promising comfort and joy with every single bite.
Tips for Success & Common Troubleshooting
Even the most experienced crepe makers have their off days. Here are some extra tips and solutions to common issues to ensure your Nutella crepe journey is always a smooth one:- Batter Too Thick/Thin: If your batter feels too thick after resting, add a tablespoon of milk or water at a time until it reaches a thin, pourable consistency similar to heavy cream. If it’s too thin, try adding a tablespoon of flour.
- Crepes Sticking: This usually means your pan isn't hot enough or isn't sufficiently greased. Ensure medium heat and a very light wipe of butter/oil between crepes.
- Lumpy Batter: Straining the batter is your best friend here. It ensures silkiness every time.
- Crepes Tearing: This can be due to too thin a batter, not enough heat (crepe isn't setting quickly enough), or attempting to flip too early. Make sure the edges are set and lifting before you flip.
- Making Ahead: Crepes can be made in advance! Stack cooled crepes between sheets of parchment paper, wrap tightly in plastic wrap, and refrigerate for up to 2-3 days, or freeze for up to 1 month. Reheat gently in a warm pan or microwave.
The beauty of making Nutella crepes is that with each one you make, your technique improves. You’ll learn to feel the right temperature, eyeball the perfect amount of batter, and develop a rhythm that makes the process effortless and enjoyable.
